What is GitHub?
GitHub (or GitLab, Bitbucket…) is a hosting service for code repositories built on top of Git. Think of it as Google Drive for code, except instead of just storing files it tracks every change, lets multiple people work on the same codebase without overwriting each other, and serves as a public showcase of what you’ve built.
The basics worth knowing before clicking around:
- A repository (“repo”) is a single project: source files, history, branches, issues.
- A commit is a snapshot of the repo at a point in time, with a message describing what changed.
- A branch is a parallel line of development; the default one is usually
main. - A push uploads your local commits to GitHub; a pull downloads remote changes.
This guide gets the account ready, creates a first repo, and sets up SSH keys so you don’t have to type a password every time you push.
1. Create the account
- Open https://github.com and sign up.
- Pick a username carefully: it ends up in every URL of every repo (
github.com/<username>/<repo>) and is hard to change later. - Verify the email address. The free plan is enough for everything in this guide: unlimited public and private repos.
- Optional but worth it: in Settings → Profile add a short bio, a profile picture, and pin a couple of repos when you have them. The profile page becomes a free portfolio.
2. Create your first repository
From the home page, click the green New button (or visit https://github.com/new).
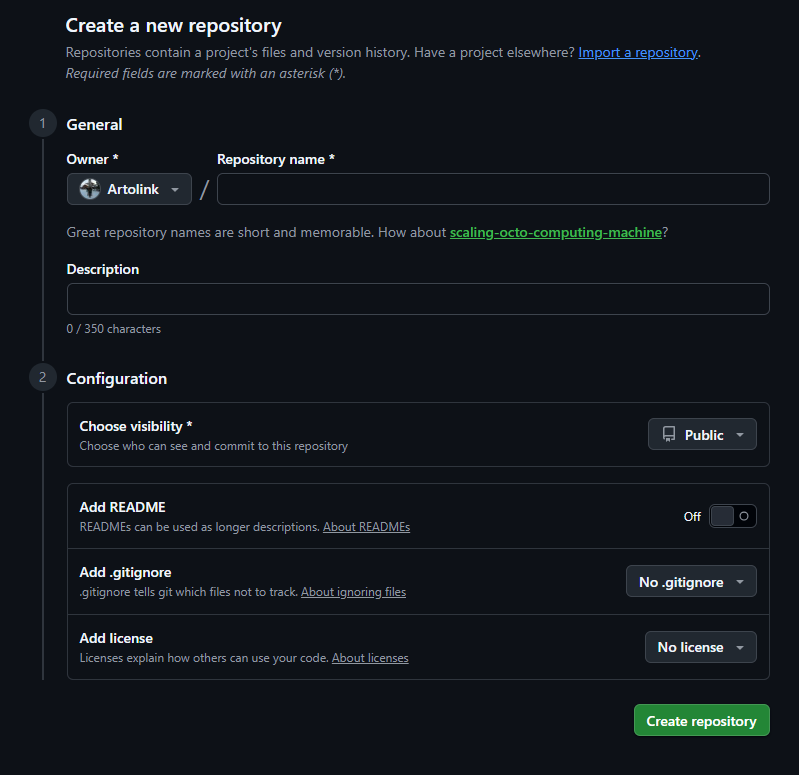
Fields that matter:
- Repository name — keep it short and descriptive. Hyphens are fine, spaces aren’t.
- Description — one line, optional but useful.
- Public vs Private — see below.
- Initialize with README — tick it for a brand-new project; leave it unticked if you already have local files to push (otherwise the first push will conflict).
- .gitignore template — pick the one matching the language (Node, Python, …); GitHub adds a sensible default ignore list.
- License — only relevant if the repo is public. MIT is the safe default if unsure.
Click Create repository. The repo URL is now https://github.com/<username>/<repo>.
Forking
You can also start by forking a repository, instead of creating one.
A fork is a copy of someone else’s repo under your username. It keeps a link to the original (“upstream”) so updates can be pulled in later.
When to fork, you ask?
When you want to:
- Customize a tool/template for personal use (this is what’s done with Quartz to build a wiki like this).
- Contribute back to an open-source project: fork, change, open a pull request.
You just need to:
- Click Fork top-right on the source repo page.
- Pick the destination (your username), optionally rename, Create fork.
- Clone the fork as usual:
git clone git@github.com:<username>/<repo>.git.
To pull updates from the original repo, later:
git remote add upstream git@github.com:<original-owner>/<repo>.git
git fetch upstream
git merge upstream/main
3. Set up SSH access
By default, Git over HTTPS asks for credentials every time.
The clean alternative is SSH: generate a key pair once, drop the public key into GitHub, and never type a password again.
1. Generate the key pair
ssh-keygen -t ed25519 -C "your_email@example.com"When prompted:
- File location: accept the default (
~/.ssh/id_ed25519) unless you already have a key there. - Passphrase: empty is fine for a personal laptop.
Two files appear:
~/.ssh/id_ed25519— the private key. Never share, never push, never paste anywhere.~/.ssh/id_ed25519.pub— the public key. This is the one to give to GitHub.
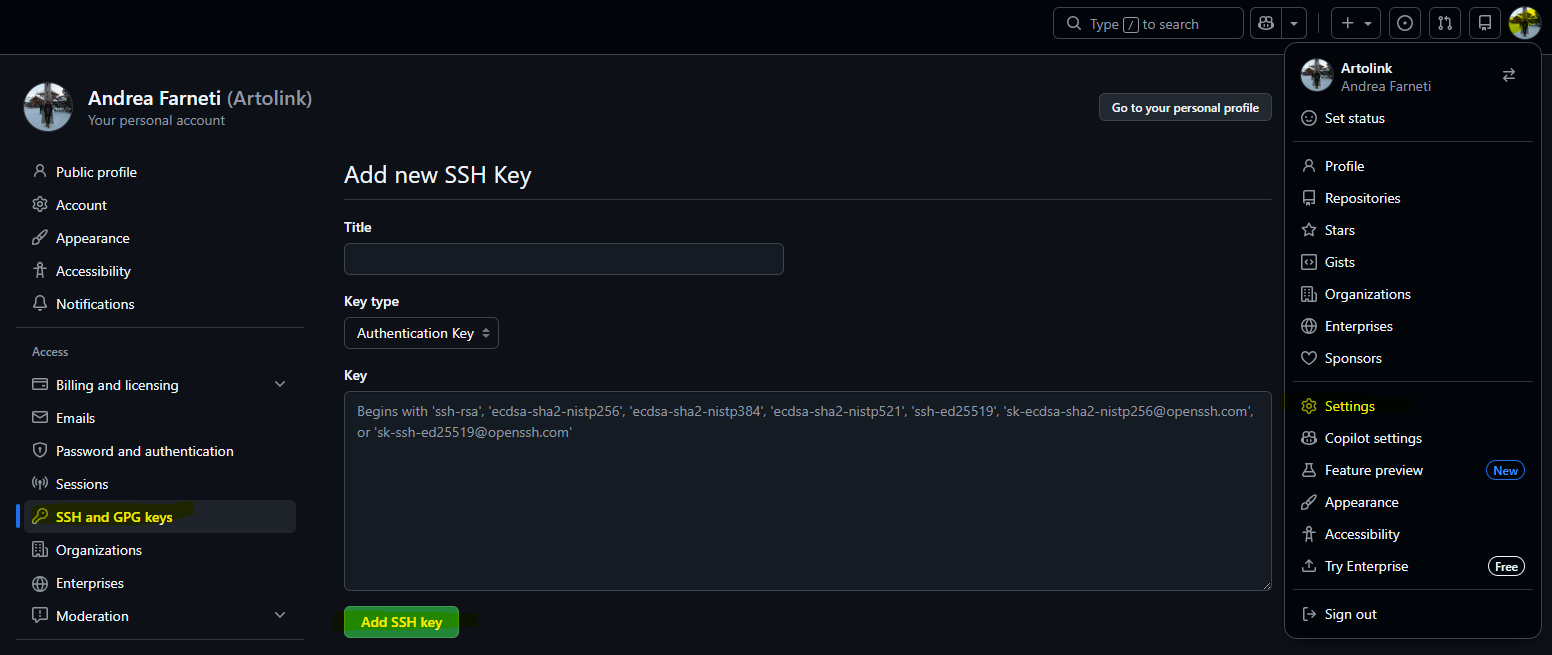
2. Add the public key to GitHub
cat ~/.ssh/id_ed25519.pubCopy the output (starts with ssh-ed25519 … and ends with the email). On GitHub:
- Click the avatar top-right → Settings
- SSH and GPG keys → New SSH key
- Title: something like
Personal laptoporVPS - farneti. The title is just a label for you. - Key type: Authentication Key.
- Paste the content into the Key field, click Add SSH key.
3. Verify it works
ssh -T git@github.comExpected response:
Hi <username>! You've successfully authenticated, but GitHub does not provide shell access.
That message is the success case: GitHub never gives a shell, the ssh -T is only checking the handshake.
4. Your first commit
Pick the SSH URL from the repo page (the Code button → SSH tab).
It looks like git@github.com:<username>/<repo>.git.
If the repo was created with a README on GitHub:
git clone git@github.com:<username>/<repo>.git
cd <repo>
# edit files, then:
git add .
git commit -m "First real change"
git push
If the repo was created empty on GitHub and you already have local files:
cd path/to/local/project
git init
git add .
git commit -m "Initial commit"
git branch -M main
git remote add origin git@github.com:<username>/<repo>.git
git push -u origin main
The -u flag links the local main to the remote main — after this, git push and git pull know where to go without arguments.
TIP
- Commit often, push when stable. Small commits with clear messages make the history readable. “Fix typo” beats one giant “WIP” commit per week.
- Write the message in the imperative.
Add login form, notAdded login formorAdds login form. Matches Git’s own style.- Never commit secrets. API keys, passwords,
.envfiles. If it happens, rotate the key immediately:git rmdoesn’t remove it from history.- Branches for anything risky. Mainline stays clean, experiments live on their own branch, merge when ready.
Files every repo should have
README.md— what the project does, how to install/run it, basic usage. Renders as the homepage of the repo..gitignore— patterns of files Git should never track (build artifacts,node_modules/,.env, IDE folders). Use the templates from https://github.com/github/gitignore.LICENSE— only for public repos. No license = nobody legally allowed to use the code, even if it’s visible.