Requires updating every existing SSH client config
GitLab SSH disabled, HTTPS-only push
No port conflict
Loses the convenience of key-based push for users
This guide uses option 2 (host SSH moved aside), the cleanest user experience (very good option if you keep GitLab in a dedicated VPS) (see also the dedicated SSH expalnation).
# 1. Move host sshd to port 2200 BEFORE bringing GitLab upsudo sed -i 's/^#\?Port .*/Port 2200/' /etc/ssh/sshd_configsudo systemctl restart ssh# 2. Open the new port on the firewall (see also linux-server-hardening §5)sudo ufw allow 2200/tcp# 3. Reconnect via the new port BEFORE closing the current session, to verifyssh -p 2200 user@vps
CAUTION
Don’t close your current SSH session until you’ve successfully reconnected on port 2200: If something goes wrong with the new config you’ll be locked out.
4. Create the directory layout
sudo mkdir -p /opt/gitlab/{config,logs,data}
This gives GitLab three persistent volumes:
Path
Holds
/opt/gitlab/config
gitlab.rb config file, certs, secrets
/opt/gitlab/logs
Application + service logs
/opt/gitlab/data
Everything else: repos, attachments, CI artifacts, container registry, DB
The data directory is the one that grows: repositories and CI artifacts accumulate.
5. docker-compose.yml
/opt/gitlab/docker-compose.yml:
services:
  gitlab:
    image: gitlab/gitlab-ce:latest
    container_name: gitlab
    restart: unless-stopped
    hostname: gitlab.yourdomain.com
    environment:
      GITLAB_OMNIBUS_CONFIG: |
        # Public URL — must match the DNS name and the nginx reverse-proxy below
        external_url 'https://gitlab.yourdomain.com'

        # GitLab listens on 127.0.0.1:8929 (HTTP) inside the container.
        # nginx on the host proxies HTTPS:443 -> here.
        nginx['listen_port'] = 80
        nginx['listen_https'] = false
        gitlab_rails['trusted_proxies'] = ['127.0.0.1']

        # SSH port for git push/pull — published as :22 on the host
        gitlab_rails['gitlab_shell_ssh_port'] = 22

        # Disable some heavy services if you don't use them
        prometheus_monitoring['enable'] = false

        # Sane defaults for a small instance
        puma['worker_processes'] = 2
        sidekiq['max_concurrency'] = 10
        postgresql['shared_buffers'] = "256MB"
    ports:
      - "127.0.0.1:8929:80"          # HTTP — only reachable from localhost (nginx)
      - "22:22"                      # SSH for git — public
    volumes:
      - /opt/gitlab/config:/etc/gitlab
      - /opt/gitlab/logs:/var/log/gitlab
      - /opt/gitlab/data:/var/opt/gitlab
    shm_size: '256m'
A few notes on the choices:
127.0.0.1:8929:80 → bind HTTP to localhost only. The internet talks to nginx, nginx talks to localhost. GitLab is never directly exposed.
nginx['listen_https'] = false → GitLab’s internal nginx serves plain HTTP, TLS termination happens on the host’s nginx.
shm_size: '256m' → Postgres needs more shared memory than Docker’s 64 MB default.
6. Start GitLab
cd /opt/gitlabsudo docker compose up -d
The first start is slow: 5-10 minutes while GitLab Omnibus initializes the database, generates the initial config, and starts every service.
Of course port 80 needs to be open, also for the Certbot verification.
If it’s not, enable it:
sudo ufw allow 80/tcp
And of course, 443/tcp too.
2. Issue the TLS certificate
sudo certbot --nginx -d gitlab.yourdomain.com
Certbot patches the vhost above: it adds the listen 443 ssl server, the ssl_certificate / ssl_certificate_key lines, an 80 → 443 redirect, and schedules auto-renewal via certbot.timer.
Pick Redirect when/if prompted then verify renewal works:
A bare GitLab instance can host pipelines (.gitlab-ci.yml), but doesn’t execute them: it needs at least one GitLab Runner to pick up jobs.
Two patterns:
Pattern
Where the runner runs
When to choose
Shared runner, same host
Docker container next to GitLab
Personal use, small team, no isolation concerns
Project runners on separate hosts
Dedicated VMs / nodes
Multi-tenant, isolation between projects, scaling
For the simplest single-host setup, deploy the runner as another container in the same docker-compose.yml:
  gitlab-runner:
    image: gitlab/gitlab-runner:latest
    container_name: gitlab-runner
    restart: unless-stopped
    extra_hosts:
     - "gitlab.farnetiandrea.it:host-gateway"
    volumes:
      - /opt/gitlab-runner/config:/etc/gitlab-runner
      - /var/run/docker.sock:/var/run/docker.sock     # so the runner can spawn Docker jobs
Why extra_hosts: host-gateway
host-gateway writes the domain into the runner’s /etc/hosts, resolving it to the host’s gateway: this way the runner reaches nginx on the host (:443) with the correct SNI and certificate, instead of the GitLab container. Entries in /etc/hosts take precedence over Docker’s internal DNS, so the name is no longer hijacked to the container’s internal IP (where :443 has no TLS listener).
Register the runner:
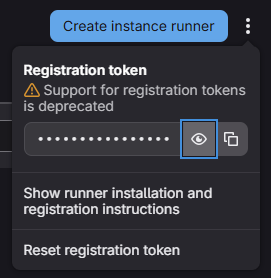
In GitLab UI: Admin Area → CI/CD → Runners → New instance runner, copy the registration token.
The job containers need the same “host-gateway” mapping: when a pipeline runs, the job containers the runner spawns must also reach gitlab.yourdomain.com to clone the repo, and they don’t inherit the runner’s extra_hosts.
To achieve that, after registering, edit config.toml (in /opt/gitlab-runner/config/) and add it under the [runners.docker] section:
The backup tarball does not include /etc/gitlab/gitlab-secrets.json and /etc/gitlab/gitlab.rb.
Restoring a backup onto a fresh install without copying those files first will lose access to encrypted secrets (CI variables, 2FA backup codes, OAuth tokens). Back them up separately:
GitLab releases a major version every month, security patches more often.
The Docker image tag latest always points to the current GA.
To upgrade (of course make a backup/snapshot first!):
cd /opt/gitlabsudo docker compose pullsudo docker compose up -d
GitLab runs DB migrations automatically on container start.
First start after an upgrade can take 5-15 minutes, be patient and watch docker compose logs -f gitlab until you see Reconfigured!.
Don't skip major versions!
GitLab requires you to upgrade one major version at a time (e.g. 15.x → 16.0 → 16.x → 17.0), not 15.x → 17.0 directly. Pin the version tag (e.g. gitlab/gitlab-ce:16.11.0-ce.0) when stepping through majors, then move back to :latest.
If the answer is no, go ahead, so that you can later:
Connect GitLab and AWX together: that way you can store inventories and playbooks in GitLab, and run them directly via Ansible AWX with a great UI!
Create CI/CD pipelines in GitLab (.gitlab-ci.yml): build, test, deploy on every push.
A good starting point could be: build the wiki Quartz site in CI and deploy via SSH to the VPS instead of running deploy.sh.
This is a real production-grade interconnected stack, a professional base for professional automation!
 https://https://gitlab.farnetiandrea.it